Abstract
When integrating a Box repository with IBM® Content Navigator, it is necessary to connect to IBM Content Navigator and Box with a secure HTTPS connection.
Contents
The information in this web doc guides you through adding the IBM® Content Navigator server’s certificate to the desktop browser for Internet Explorer, Firefox, and Chrome. This document is an associated web doc for the web doc How to Successfully Integrate IBM Content Navigator with Box Repository, TIPS1350, found at:
http://www.redbooks.ibm.com/abstracts/tips1350.html
Use the web server administrative console to check that the server that is hosting IBM Content Navigator has a valid SSL Server Certificate, which is self-signed or signed by a recognized authority. Ensure that the desktop browser (Internet Explorer, Chrome, or Firefox) can establish a trusted HTTPS connection to the web server without any certificate errors or security risk warnings. It is important that you are not presented with a certificate error.
Figure 1 shows an example of an IBM WebSphere® root certificate in the IBM WebSphere Application Server administrative console.
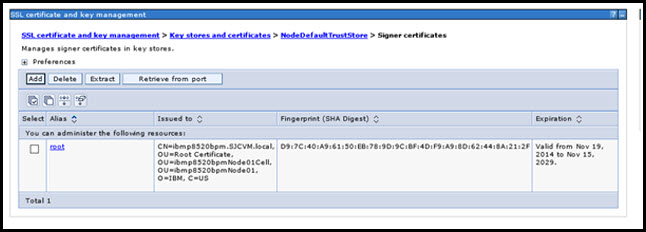
Figure 1. Example WebSphere root certificate
Configuring Internet Explorer
To configure Internet Explorer, complete these steps:
- Add the HTTPS connection URL host name to the Internet Explorer Trusted Sites.
- Connect to IBM Content Navigator by using HTTPS and the HTTPS port (use the application server default 9443 and the front-end proxy default 443).
- If the root certificate is not imported into Internet Explorer, you get a security warning. Continue to the site and you see a red certificate error on the address bar.
- Click the certificate error, view the certificate, view the Certificate chain path, and install the root certificate into the Certificate store: Trusted Root Certification Authorities.
- Restart the browser and check that the connection to IBM Content Navigator completes without any certificate security warnings.
Figure 2 shows where to add the IBM Content Navigator URL host to the Internet Explorer Trusted Sites list.
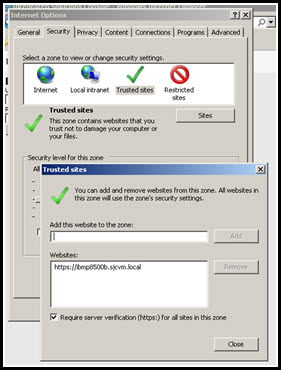
Figure 2. Adding the IBM Content Navigator host to the trusted sites
Figure 3 shows an HTTPS browser connection with a non-existent or invalid certificate.
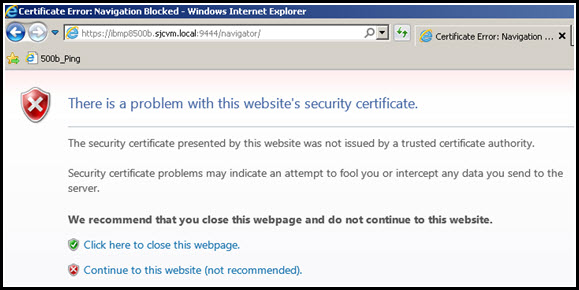
Figure 3. Connecting to IBM Content Navigator and clicking “Continue to this website” if prompted
Figure 4 shows a certificate error that is reported by Internet Explorer.

Figure 4. Clicking the “Certificate error” message on the address bar
Figure 5 shows an example of an untrusted root certificate in the certificate chain path.
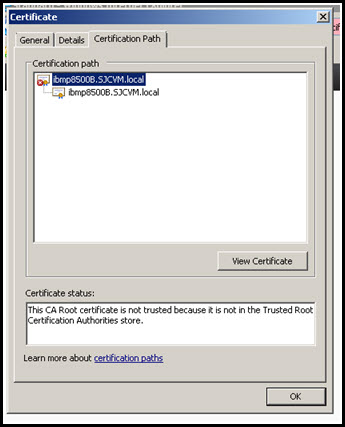
Figure 5. Viewing the certification path to select the root certificate and clicking View Certificate
Figure 6 shows clicking Install Certificate and installing the root certificate into the Trusted Root Certification Authorities store.
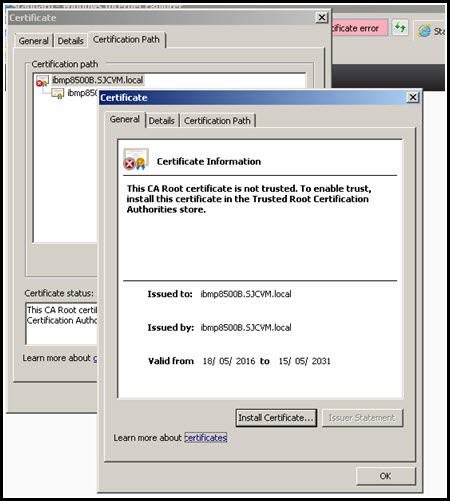
Figure 6. Clicking Install Certificate and installing the root certificate in the Trusted Root Certification Authorities store
Figure 7 shows the selection of the Trusted Root CA store.
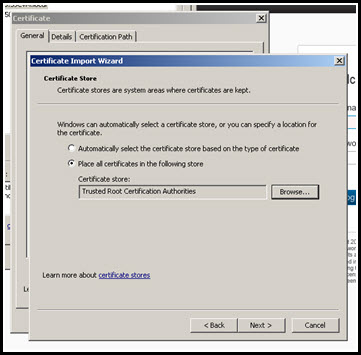
Figure 7. Choosing the option to store the certificate in the Trusted Root CA store
Figure 8 shows a successful trusted connection after restarting the browser.
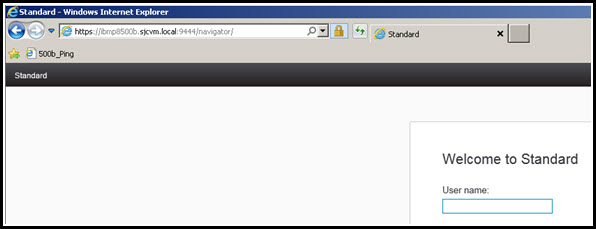
Figure 8. Restarting the browser, connecting to IBM Content Navigator, and checking that there are no certificate warnings
If the certificate is created for a named host, ensure that you use the same host name format for the host name in your IBM Content Navigator URL. If the certificate uses the host short name, your IBM Content Navigator URL must use the host short name. If the certificate uses the FQDN, your IBM Content Navigator URL must use the FQDN.
Configuring the Firefox browser
When using Firefox with an untrusted certificate, you see the window that is shown in Figure 9.
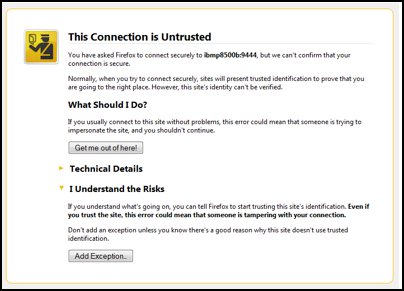
Figure 9. Example of an untrusted connection with Firefox
To configure the Firefox browser, complete the following steps:
- Click Add Exception, and then in the window that opens, which is shown in Figure 10, click Get Certificate. Click View.
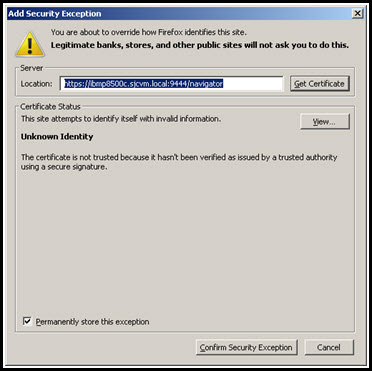
Figure 10. Firefox Security Exception window
- In the Certificate Viewer, which is shown in Figure 11, click the Details tab and select the root certificate.
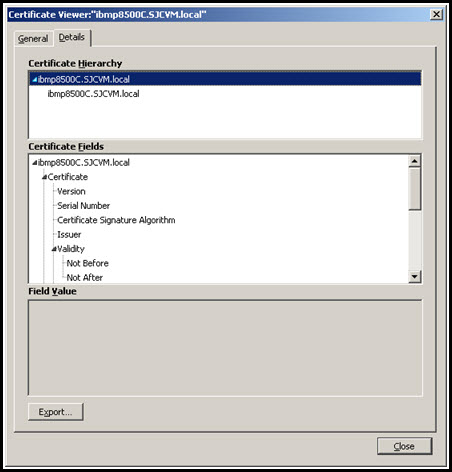
Figure 11. Firefox Certificate Viewer
- Click Export at the lower left of the Certificate Viewer window (Figure 11).
- Save the file with a .crt or .pem extension, then close the Certificate Viewer and Security exception windows. Open the Firefox Options menu, as shown in Figure 12.
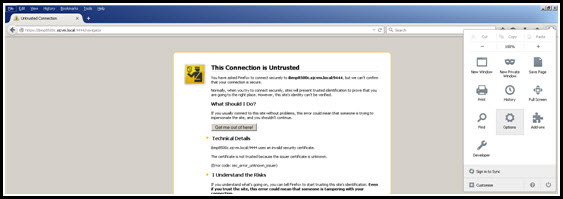
Figure 12. Selecting the Firefox Options menu
- Select Advanced > Certificates > View Certificates to access the Certificate Manager, as shown in Figure 13.
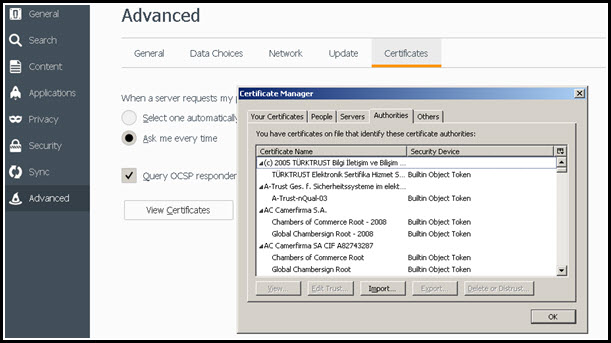
Figure 13. Firefox Certificate Manager
- Select the Authorities tab and click Import to import the root certificate that was exported in step 3. Trust the CA certificate to identify websites.
- Close and restart the browser, and reconnect to the IBM Content Navigator URL.
- The connection should now be secure and trusted. Click the padlock icon to check the status.
Configuring the Chrome browser
To configure the Chrome browser, complete the following steps:
- Click Customize and Control Google Chrome at the far right of the Chrome address bar and select Settings, as shown in Figure 14.
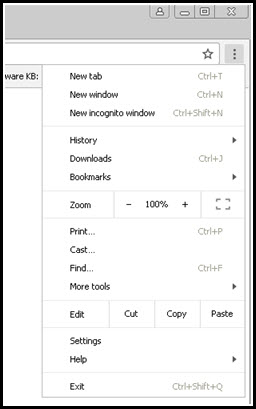
Figure 14. Selecting Settings
- Type certificates into the search box in the Settings window, as shown in Figure 15.

Figure 15. Managing certificates in Chrome
- Click Manage certificates.
Chrome on a Windows PC uses the same local certificate store as Internet Explorer, so if you already imported your Trusted CA certificate for Windows Internet Explorer, it already is available to Chrome. If it is not available, you see what is shown in Figure 16 when you connect to IBM Content Navigator with Chrome.
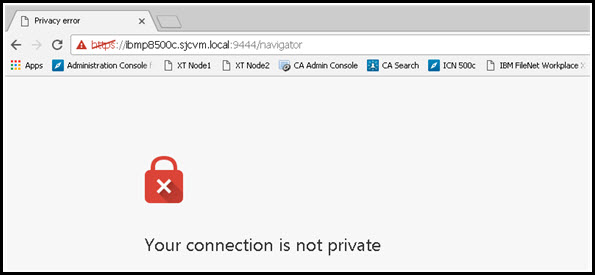
Figure 16. Untrusted connection in Chrome
Either use the earlier instructions for Internet Explorer to add the certificate, or use the following method:
Click the red triangle on the address bar, and then click Details. Figure 17 shows the information window that opens.
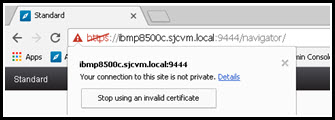
Figure 17. Chrome connection information window
After clicking Details, click View certificate in Security Overview. In the Certificate window, select the Certification Path tab, as shown in Figure 18.
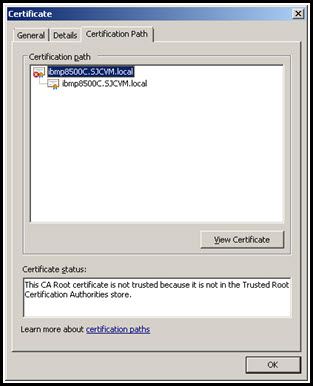
Figure 18. Chrome Certificate Viewer
Select the top-level root certificate and click View Certificate. Select the Details tab and then Copy to file. The Certificate Export Wizard window opens, as shown in Figure 19.
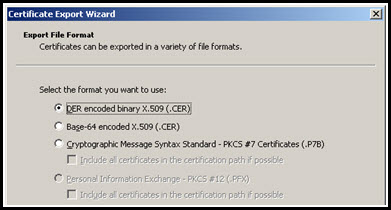
Figure 19. Chrome Certificate Export Wizard
Save the certificate file by clicking Next. Save the file with a .cer extension, as shown in Figure 20.
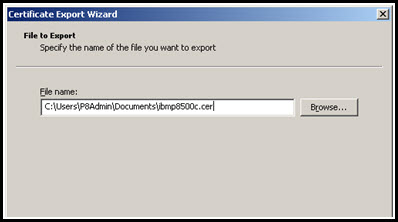
Figure 20. Saving the certificate from the Export Wizard
Click Next and then Finish. Close Chrome and start the Windows local certificate manager on the desktop by running certmgr.msc. Figure 21 shows an example of the certificate manager console window.

Figure 21. Microsoft Certificate Manager Console
- Expand the Trusted Root Certification Authorities folder, right-click the Certificates folder, and select Import, as shown in Figure 22.
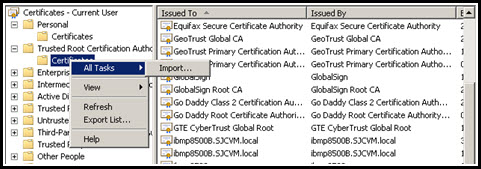
Figure 22. Selecting the Import option
- Import the .cer file that was exported in step 3 (Figure 23).
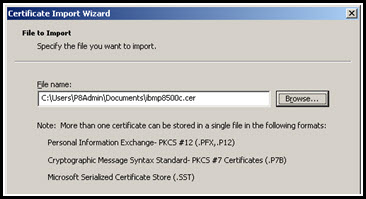
Figure 23. Selecting the certificate file that you want to import
- Click Next and save the certificate in the Trusted Root CA store, as shown in Figure 24.
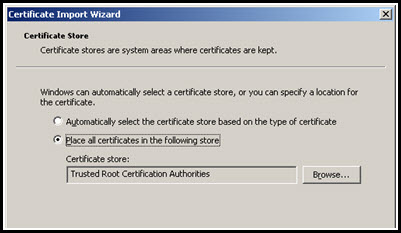
Figure 24. Saving the certificate in the Trusted Root Certification Authorities store
- Click Next and then Finish.
- To complete the import, accept the security message by clicking Yes if prompted with a window that is similar to Figure 25.
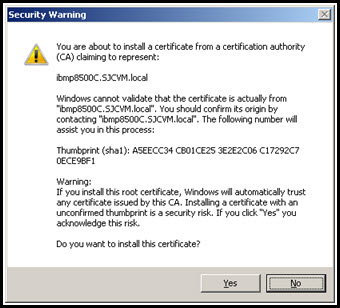
Figure 25: Complete the installation of the root certificate
Some versions of Chrome might report an obsolete encryption method. Despite this warning, the connection is still secure and you can continue with Box integration. For more information about how Google Chrome evaluates secure connections in the Chrome browser, see the following website:
https://www.google.com/transparencyreport/https/faq/#modernconfig
Others who read this also read
Special Notices
The material included in this document is in DRAFT form and is provided 'as is' without warranty of any kind. IBM is not responsible for the accuracy or completeness of the material, and may update the document at any time. The final, published document may not include any, or all, of the material included herein. Client assumes all risks associated with Client's use of this document.
